Styling costs you reliability. This tool shows you how much
Every decoration you add to a QR code takes something away from its ability to be read. A logo covers modules. Low contrast makes the camera work harder. Dot shapes shrink each module slightly. None of that is a reason never to style a code, but it is a reason to know where the line is.
Most styling tools let you sail past that line and find out at the printers. This one decodes your styled code on every change and tells you straight away whether it still works, using the same method we used for our damage testing.
The check under the preview is the point of this tool. It is not a guess or a rule of thumb. We run a real decoder over the image you are looking at and report what comes back.
What the limits are, and where they come from
These are not numbers we copied from elsewhere. We measured them:
| Choice | What we found | What the tool does |
|---|---|---|
| Logo size | Level H survived 19% of the area covered on a clean image, and failed above that | Warns past 15%, caps the slider at 30% |
| Error correction with a logo | Anything below H fails quickly once modules are covered | Forces H automatically when a logo is added |
| Inverted codes | A light on dark code failed to decode at all in our test | Warns you when the foreground is lighter than the background |
| Contrast | Low contrast decodes in software but struggles with real cameras | Warns below a ratio of 4 to 1 |
| Corner markers | Removing a single module from one corner killed the code outright, but reshaping one while keeping its structure did not | Offers four corner shapes, never removes or covers modules, and decodes the result every time |
That last row is why the finder patterns stay plain squares no matter which module style you pick. They are what the scanner uses to find the code at all, and our testing showed they have effectively no damage tolerance.
Getting a logo right
- Use a simple mark, not a full logo with text. Small text inside a QR code is unreadable anyway and wastes the area you are spending.
- Prefer a transparent PNG or a square mark. The tool places a background coloured pad behind it so the edges stay clean.
- Start at 12% and increase only if you need to. Smaller logos leave more error correction budget for print imperfections, which is where codes actually fail.
- Print larger than you would without a logo. You have spent the redundancy on decoration and have none left for a scuff or a fold.
Colour choices that survive contact with reality
The safe rule is dark modules on a light background. Within that, brand colours are usually fine if the dark side is genuinely dark. What breaks:
- Inverted codes. Light modules on a dark ground look striking and fail on a meaningful share of scanners. Our test could not decode one at all.
- Mid tone on mid tone. Two colours that look different to your eye can be close in luminance, which is what the camera actually measures.
- Gradients. Contrast varies across the pattern, so part of the code is always the weakest link.
- Transparent backgrounds. The code ends up over a photo or a coloured panel and the contrast becomes unpredictable.
Styling the corners, and why we changed our mind
The three large squares in the corners are position markers. Our damage test found that removing a single module from one kills the code outright, while the same code shrugged off 19% of its area being covered in the middle. On that basis this tool originally refused to touch them at all.
That was too blunt. Removing part of a marker and reshaping one are different things. We tested four corner shapes, in a matching colour and in a contrasting one, and every combination decoded. The decoder locates the markers by their proportions, and rounding the outside of a shape leaves those proportions intact.
So the corner styles are here now, with the rule that actually matters kept in place: nothing is ever removed from a marker, and the result is decoded on every change. If a combination does break, the verdict under the preview will say so rather than leaving you to find out in print.
Gradients and transparent backgrounds
A gradient works as long as both ends stay dark against the background. The scanner is looking at contrast, and a gradient that fades towards light has a section where there is not enough of it. The check below measures the weaker end rather than the colour you picked first, so a gradient that fails will be caught for the right reason.
A transparent background is not really a background. The code takes the colour of whatever you place it on. We check it against white, which is the common case, but drop the same file onto a dark photo and it becomes an inverted code, and many scanners refuse those. If the destination is dark, set a light background colour instead of going transparent.
Adding text below the QR code
Tick the box above and the tool draws a label strip under the code with whatever wording you type. This is the single most useful thing on this page, and it does more for your scan rate than any amount of colour or dot styling.
An unlabelled code on a poster gets very few scans, because people do not scan things when they cannot predict what will happen. "Scan for the menu" beats a beautifully styled code with nothing written on it.
The important detail is where the text goes. It sits below the code, outside the quiet zone, so it never touches the code area and cannot affect whether it scans. Putting text inside the code, or over it, or cropping the white border to make room for it, is how people break codes that were working. Our scan limits test covers what actually breaks a scan.
Keep the line short. Four or five words fit cleanly at any printed size. A long sentence shrinks the type until it is unreadable at the distance the code is meant to be scanned from, and our sizing guide covers picking that distance.
Test the printed version, not just the preview
The check in this tool decodes a clean digital image, which is the most forgiving case. A phone camera pointed at printed paper in a dim room is a harder test.
So before a print run: print one at final size on the real stock, and scan it with an ordinary phone, at the real distance, at an angle. A styled code that passes that has earned its decoration. Our print sizing guide covers the numbers.
Which colours still scan: our test of 20 pairs
How we tested
We generated one QR code, a 29 by 29 grid holding a web address, at error correction level M. We then drew it 20 times in different foreground and background colours at the same size, and tried to decode each image three ways:
- OpenCV, a widely used computer vision library with its own QR detector.
- jsQR in its default mode, the open source decoder our tools use.
- jsQR told to try the colours inverted as well, which is how a scanner that supports light on dark codes would behave.
For each pair we also worked out the contrast ratio using the standard web accessibility formula, where 1 to 1 means identical brightness and 21 to 1 is black on white.
Software decoders, not phones. Phone cameras use their own scanning code, and they will not all agree with ours. This test is a clean digital render with no print, no glare and no camera blur. Treat it as a map of where the risk is, then check your own code on real phones.
The results, all 20
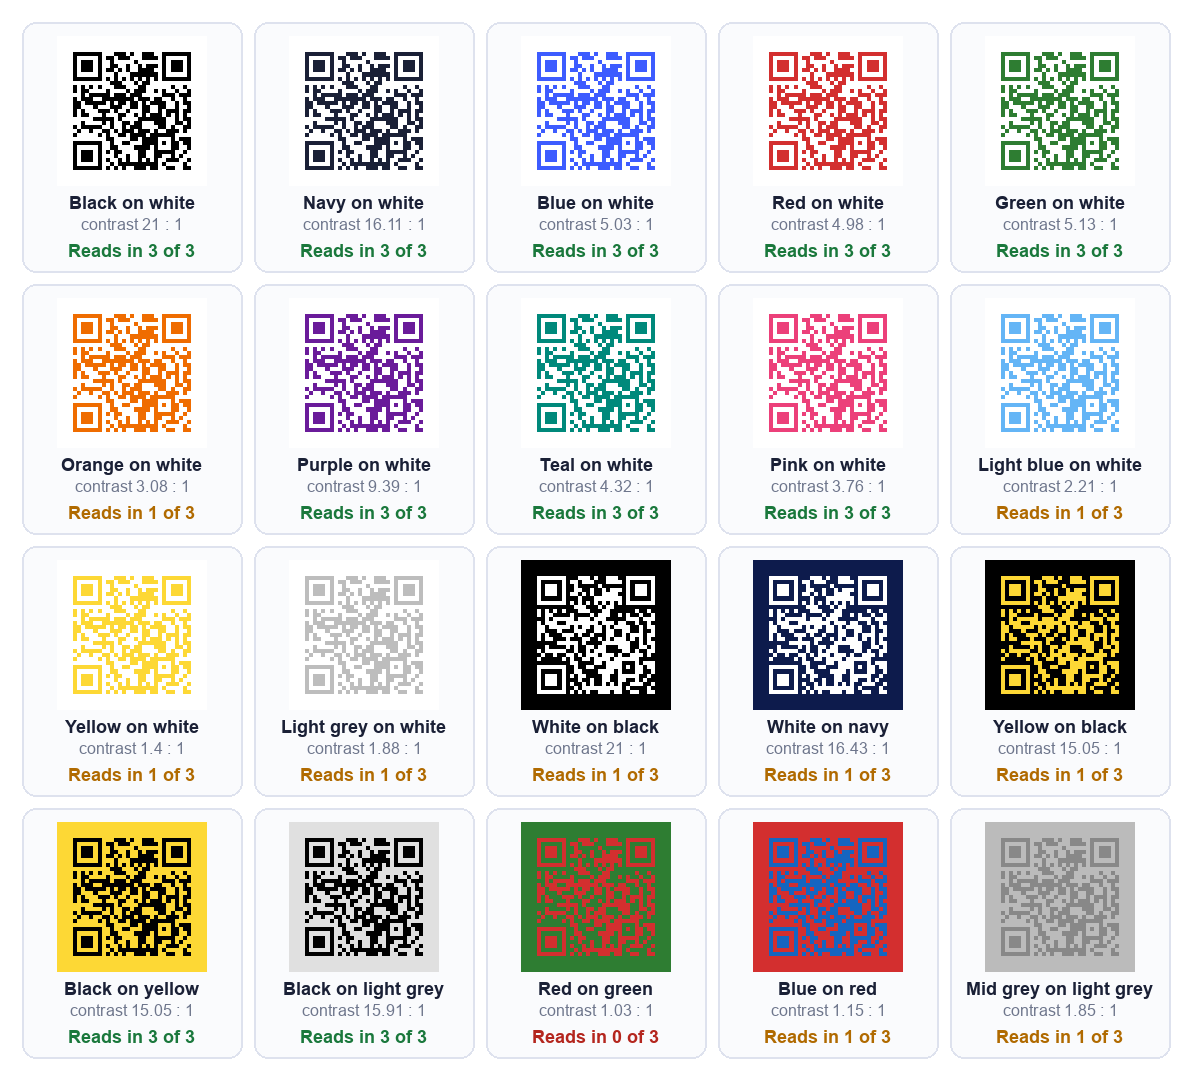
| Colour pair | Contrast | OpenCV | jsQR default | jsQR, inverted too |
|---|---|---|---|---|
| Black on white | 21 : 1 | Reads | Reads | Reads |
| Navy on white | 16.11 : 1 | Reads | Reads | Reads |
| Blue on white | 5.03 : 1 | Reads | Reads | Reads |
| Red on white | 4.98 : 1 | Reads | Reads | Reads |
| Green on white | 5.13 : 1 | Reads | Reads | Reads |
| Orange on white | 3.08 : 1 | Reads | Fails | Fails |
| Purple on white | 9.39 : 1 | Reads | Reads | Reads |
| Teal on white | 4.32 : 1 | Reads | Reads | Reads |
| Pink on white | 3.76 : 1 | Reads | Reads | Reads |
| Light blue on white | 2.21 : 1 | Reads | Fails | Fails |
| Yellow on white | 1.4 : 1 | Reads | Fails | Fails |
| Light grey on white | 1.88 : 1 | Reads | Fails | Fails |
| White on black | 21 : 1 | Fails | Fails | Reads |
| White on navy | 16.43 : 1 | Fails | Fails | Reads |
| Yellow on black | 15.05 : 1 | Fails | Fails | Reads |
| Black on yellow | 15.05 : 1 | Reads | Reads | Reads |
| Black on light grey | 15.91 : 1 | Reads | Reads | Reads |
| Red on green | 1.03 : 1 | Fails | Fails | Fails |
| Blue on red | 1.15 : 1 | Reads | Fails | Fails |
| Mid grey on light grey | 1.85 : 1 | Reads | Fails | Fails |
Where the contrast line sits
Look only at the dark-on-light pairs. Pink on white, at 3.76 to 1, was read by every decoder, and so was everything with more contrast than that: teal, red, blue, green, purple, navy and black.
Orange on white, at 3.08 to 1, was not. OpenCV read it and both jsQR settings failed. So for this code, the line sits somewhere between 3.08 and 3.76.
That is one code, and the exact line will move a little with the code's size and density. It is why our designer warns below 4 to 1 rather than at the lowest figure that happened to work. A margin is worth having, because printing can take some contrast away.
In the designer we saw the same story. Blue on white scanned cleanly. Orange on white scanned with a warning that contrast was only 3.1 to 1. Yellow on white and light grey on white were flagged as not scanning, with contrasts of 1.4 and 1.9 to 1.
Light on dark is a different problem
Three pairs had a lot of contrast and still failed: white on black, white on navy and yellow on black. Their contrast ratios are 21, 16.43 and 15.05 to 1.
The reason is not contrast. A standard QR code is dark modules on a light background, and these three are the other way round. OpenCV and default jsQR both failed all three. They only read when we explicitly told jsQR to try inverted images as well.
Compare yellow on black with black on yellow. The same two colours at the same 15.05 to 1 ratio, swapped. One read in all three settings and the other in just one. Which colour is darker matters more than which colours you chose.
Some scanners do handle inverted codes and some do not, and a printed code cannot tell you which kind it will meet. If you want a dark design, keep the code dark and make the background light, or put a light panel behind the code on the dark design.
Common questions
Why does the tool force level H when I add a logo?
Because anything lower fails almost immediately once modules are covered. In our testing, level M managed 8% of its area covered while H managed 19%. With a logo you need every bit of that budget.
Why can I not style the three corner squares?
They are position markers, and the scanner uses them to locate the code before reading anything. We tested this: removing a single module from one corner killed a code that had shrugged off 19% of damage elsewhere. Styling them is a popular feature elsewhere and a bad idea.
Do dot and rounded styles reduce scannability?
Slightly, because each module ends up marginally smaller than a full square. At normal print sizes it rarely matters. At small sizes, use squares.
My code says it does not scan. What now?
In order: reduce the logo, raise the contrast, switch back to square modules, and check you have not inverted the colours. The check updates as you change each one, so you can find the specific culprit rather than guessing.
Related tools
For a plain, maximally reliable code, the dedicated generators are simpler: URL, WiFi, vCard and the rest. Need many at once? The bulk generator does lists. And the scanner lets you verify any finished code, styled or not.